Friday, February 21, 2014

Italian Cheese-Stuffed Meatloaf


This recipe takes meatloaf to a flavorful, cheesy new level. I've been making this for 12(?) years, and we still love it. The original recipe came from one of those little recipe booklets that sit at grocery store check-out lines. (I used to have a real addiction problem when it came to those little booklets...) If you don't want to mess with the swirl of cheese inside, you can just form the meat mixture into a loaf and cook it that way. I've also made this into mini-meatloaves and meatballs (formed around a small square of cheese), and it's always a great thing.

I know this post would benefit from step-by-step pictures of how to roll the cheese up inside the meat mixture, but I didn't get any this time, and I really want to share this recipe with you. I'll update the post with some pictures one of the next times I make it. In the meantime, I'll try to be super clear on the rolling-up process. It's not hard. You can totally do it.

I used my favorite pizza sauce for this, but you can use store-bought if you have it. Though this homemade recipe is so good and easy you won't want to use store sauce ;) I also want to say that since I hate touching raw meat and having to get it out from under my fingernails, I wear disposable latex gloves. I only want to use one pair, so I get everything ready for assembly so I don't have to take off the gloves to get anything or tear more foil.

Sometimes I also add black olives and chopped, roasted red bell peppers to the cheese filling. It's also super-yum. I should also tell you that sometimes the cheese will break through and bubble out. Even after all these years of making it I've been unable to tell why it does sometimes and doesn't other times. So be prepared for the cheese to make a break for it, just in case. It's not as pretty when it happens, but it's still just as tasty.

A fun historical fact: Back when my husband and I were just starting to date, he was at my house and he was hungry. I told him I had some of this meatloaf in the fridge. He made himself a sandwich with a slice of the meatloaf and two slices of bread. Yep. I'm pretty sure that's when he knew he wanted to marry me.

Italian Cheese-Stuffed Meatloaf
printable recipe

1 1/2 lbs lean ground beef
1 cup dried Italian-style bread crumbs
1/2 cup shredded fresh Parmesan cheese
1 1/2 teaspoons dried basil
2 eggs
2 cloves garlic, minced
1/2 teaspoon salt
Fresh crack black pepper to taste
1 cup pizza sauce, divided
1 1/2 cups shredded mozzarella or provolone cheese

1. Heat your oven to 375. Line a baking sheet with foil and spray with olive oil or non-stick spray. Tear a second, large sheet of foil and set it aside.

2. In a large bowl, combine the ground beef, bread crumbs, Parmesan cheese, basil, eggs, garlic, salt and pepper, and 1/2 cup of the pizza sauce. Mix well with a rubber spatula or your hands (I think hands work best. Yes, I wear my latex gloves).

3. On the second sheet of foil, shape the beef mixture into a rectangle that's about 12x10-inches. (Still have my latex gloves) Top with the cheese leaving a 1/2-inch border all around. Starting at a short end, roll up the meatloaf jelly-roll style. The easiest way to do this is to use the foil as a guide: as you pick up the edge of the foil the meatloaf will want to automatically roll in on itself. As you roll it up try to keep it pretty tight on itself. When you've finished rolling it up, seal the seam  and both ends by gently squishing the meat together. Transfer the meatloaf to your prepared baking sheet, seam side down.

4. Bake the meatloaf for 40 minutes. Remove from the oven, spread the remaining 1/2 cup pizza sauce over the top and sides, and return to the oven for 15-20 minutes, or until the loaf is thoroughly cooked in the center (about 160deg). Let the meatloaf rest for 8-10 minutes before slicing.

Makes about 8 1-slice servings.

Monday, February 10, 2014

Lembas Bread (Elvish Traveling Bread)


I've mentioned before that my teenage daughter is becoming quite the rock star in the kitchen. She's been learning how to cook more and more things and we are going to start ramping it up, since she's leaving for college in the fall (Ahhh! It's totally freaking me out.). Last week she used her kitchen skills to make this lembas bread. It was quite dramatic since she wouldn't tell me what she was making until it was finished. It was really fun to watch her make it :)

I should note she found the recipe on Tumbler, and doesn't know where it came from before that.


For those of you who aren't Lord Of the Rings fans, lembas bread is Elvish traveling bread. Apparently it is so magical that one bite is enough to satisfy the hunger of a fully grown man. But not Hobbits, as they can easily pound down several of them at a time ;)


 Ahhh...Love these movies.


Turns out, lembas bread is basically a scone. A delicious, tender, lightly-cinnamony scone. They were so delicious it was hard for me to stop after one. Or two. I stopped after two. Until the next morning when I had another one.


Lembas Bread (Elvish traveling bread)
printable recipe

2 1/2 cups all-purpose flour
1 tablespoon baking powder
1/2 teaspoon salt
1/2 cup butter, softened
1/3 cup packed brown sugar
1 teaspoon ground cinnamon
1/2 teaspoon honey
2/3 cup heavy whipping cream, plus extra if necessary
1/2 teaspoon vanilla

1. Preheat your oven to 425. Line a baking sheet with a Silpat liner or parchment paper.

2. In a large bowl, mix together the flour, baking powder, and salt. Add the butter and mix with a hand mixer until the mixture looks like fine granules. Add the sugar and cinnamon and mix well.

3. Add the honey, heavy cream, and vanilla, and mix well with a fork until a thick dough forms. If the dough is too dry, add more cream, 1 tablespoon at a time until the dough comes together.

4.  Turn the dough out onto a work surface lightly dusted with flour. Roll the dough out to 1/2-inch thick. Cut the dough into 3-inch squares and transfer them to the prepared baking sheet. Lightly cut a criss-cross, corner to corner, with a sharp knife, careful to not cut all the way through.

5. Bake for 10-12 minutes, or until the dough is set and lightly golden. Cool completely before eating (If you can wait).

Makes about 9 lembas breads.

Friday, February 7, 2014

Why I index my cookbooks and magazines


It may be very nerdy, but I index my cookbooks and cooking magazines. I started doing it years ago after I got tired of not being able to find recipes I knew I'd seen...somewhere....in one of my cookbooks or magazines. I got a little notebook and started indexing, one book at a time. I do the indexing, I flipped through the pages and if a recipe looked interesting I wrote down the name of the recipe and the page it was on. For such a simple idea, it has made a world of difference. Now when I am planning my menus, or am looking for a specific recipe I know I wanted to try, I flip through my index book (now books) and I can find it pretty fast.

If you feel like you can never find a recipe you're looking for like I used to, consider indexing your cookbooks and magazines--you might find that you love it!

Thursday, February 6, 2014

Simple Sauteed Carrots & Fennel


I recently drove a few towns over to a fancy grocery looking for Dutch-processed cocoa to use in my quest to find a delicious homemade hot chocolate mix, and I came across these gorgeous carrots:


Aren't they fantastic? I may have squee'd ever so softly when I saw them. I was so excited I had to buy some. I wanted to use them in a way that highlighted their amazing colors, so I just sauteed them in a pan with some chopped fennel and a bit of olive oil. And butter. It's a simple, fast way to prepare carrots for a side dish. 

We put in a huge garden area when we built our house, and I'm so excited to add these to our list of things we'll grow. Love. Them. Fennel and carrots are both spring and fall veggies, so if you plant a garden you can plant both at the same time to be able to enjoy together.

Simple Sauteed Carrots & Fennel

2 teaspoons olive oil
1/2 small bulb fennel, chopped (remove core before chopping)
6 medium carrots, scraped and sliced about 1/4" thick
kosher salt and fresh cracked white pepper to taste
2 teaspoons butter
chopped fennel fronds for garnish, if desired

Heat the olive oil in a large non-stick skillet until hot. Add the fennel and carrots and cook, stirring often, until starting to soften, about 3 minutes. Add the salt and pepper, and continue cooking, stirring often until the vegetables are tender and starting to brown, about 5 more minutes. Add the butter to the skillet and stir until melted. Serve sprinkled with chopped fennel fronds, if desired.

Makes 4 side-dish servings.

Wednesday, February 5, 2014

Beverly's Double-Chocolate Oatmeal Cookies


In my new neighborhood there lives a lady named Beverly. Beverly loves to cook as much as I do, and, super-happy for me, she also loves to share her love of cooking. I got home from running errands a few days ago and there was a plate of cookies in my kitchen. "Ooo! Cookies!" My husband broke the news to me that they were actually for my teenage daughter, who is in Beverly's class at church. Meh. I figured they were on my counter in my kitchen. Besides what kind of parent would I be if I didn't check the cookies first?

They were so, so amazing. Chewy and chocolatey, with a very interesting and very nice texture. When I asked Beverly what was in them she said grated chocolate plus the chocolate chips (Yum...there's the "chocolatey" part) and pulverized oatmeal (there's the texture part). Giving the oatmeal a whirl in a food processor is so clever.

This recipe makes about 8 dozen cookies. That's a whole-lotta cookies. If you don't need so many, the recipe easily halves.


Beverly's Double-Chocolate Oatmeal Cookies

2 cups butter, room temperature
2 cups sugar
2 cups brown sugar
4 eggs
2 teaspoons vanilla
4 cups flour
5 cups old fashioned oatmeal (measured then pulverized in food processor)
1 teaspoon salt
2 teaspoons baking powder
2 teaspoons baking soda
8 oz grated semi-sweet baking chocolate
24 oz semi-sweet chocolate chips

1. Heat your oven to 350. Line baking sheets with silpat liners or parchment paper.

2. Cream together the butter and both sugars until smooth. Add the eggs, 2 at a time, mixing well after each addition. Add the vanilla and mix well. Scrape down the sides of the bowl.

3. Add the flour, pulverized oatmeal, salt, baking powder, baking soda, and grated chocolate. Mix well, scraping down the sides of the bowl if necessary. Add the chocolate chips and mix gently until combined.

4. Use a regular-size cookie scoop to scoop the dough onto the prepared baking sheets, leaving at least 2 inches between each scoop. Bake for 8-10 minutes. Cookies will appear soft and underdone; they will set up as they cool. Leave on the cookie sheet 3-4 minutes before transferring to cooling racks.

Makes about 8 dozen cookies.

Monday, February 3, 2014

Roasted Cauliflower-White Cheddar Soup


I've wanted to try making cauliflower cheese soup for a long time. I finally tried this recipe from Mel's Kitchen Cafe I found on Pinterest. Sometimes I make a recipe that is so good I can hardly stand it. The combination of flavors in this soup is amazing. Roasting the cauliflower first, instead of boiling it, gives it an incredible, complex flavor, and the rosemary and thyme is perfect with the white cheddar. I had to fight off my family so I could save a bowl to take pictures the next day. 

I only did a few minor things differently: I pureed all of the soup, instead of half of the soup, because I wanted it to be smooth (I did keep out a couple pieces of the roasted cauliflower to use as garnish). Then I needed to add a bit more milk to make it the right consistency. And I left off the croutons. Other than that, this is all Mel. You should take a minute to go peruse her recipes, she has some really nice looking stuff over at her blog. 

Use the best cheese you can stand to buy. Good quality cheese will melt nicely and won't make the soup greasy.


Roasted Cauliflower-White Cheddar Soup (from Mel's Kitchen Cafe)
printable recipe

1 head cauliflower, cored and cut into bite-sized pieces
1-2 tablespoons olive oil
4 cloves garlic, minced
1/2 onion, diced
1/2 teaspoon dried thyme
1/2 teaspoon dried rosemary, crushed
1 32-oz carton chicken broth
1 cup milk
1 1/2-2 cups sharp white cheddar cheese, shredded
kosher salt and white pepper to taste
thinly sliced green onion (or chopped parsley) for garnish, if desired
extra shredded cheese for garnish, if desired
reserved pieces of roasted cauliflower for garnish, if desired

1. Heat your oven to 400. Line a baking sheet with foil and spray it with non-stick spray or mist with olive oil.

2.  Put the cauliflower on the baking sheet and drizzle with 1 tablespoon of the olive oil, or mist with olive oil. Roast for 20 minutes, or until crisp-tender and browned in places. Stir 1 or 2 times during roasting.

3. Meanwhile, heat the remaining tablespoon olive oil in a medium pot. Add the garlic and onion, and cook until softened, about 5 minutes, stirring often. Add the thyme and rosemary and cook 3 more minutes.

4. Add the roasted cauliflower and chicken broth, and bring to a boil over medium-high heat. Cover, reduce the heat to maintain a simmer, and cook for 10 minutes.

5. Transfer the mixture to a blender and puree until smooth. **IMPORTANT: Let the soup cool for about 5 minutes before blending, and make sure to remove the plastic stopper in the blender cover and hold a folded towel or paper towels over the hole. Speaking from past experience when blending hot soup, this will prevent a very sad explosion of soup all over your kitchen. (OR you can blend the mixture smooth with an immersion blender right in the pot.)

6. Return the blended soup to the pot. Over medium heat, add the milk and cheese and stir gently while the soup heats through and the cheese melts. Add kosher salt and fresh cracked white pepper to taste. Serve with green onion and extra cheese, and reserved pieces of roasted cauliflower.

Makes 4-6 servings.

Menu Plan: Week of Feb 3-Feb 9


I love to plan menus. When I plan meals it's easier to shop and it's easier to make sure I have something ready to fix for dinner. There was a time--when I had fewer kids and less going on--that I cooked almost every night. That's not where I am right now. I always plan in days where I know I won't be cooking (or we won't be eating left-overs). Even then, sometimes the week goes according to the plan and sometimes it doesn't, but that's just how life works, right? I try to be flexible and not worry too much when my well-planned dinner turns into take-out ;)

Here's our menu plan for this week, hopefully you'll find something that inspires your own plan :)
Week of Feb 3-Feb 9
Monday: no meal planned
Tuesday: Red Beans & Rice; Salad (didn't get to it last week)
Wednesday: Tuscan Chicken; Biscuits
Thursday: Cheese-Stuffed Meatloaf; Veggies
Friday: left-overs
Saturday: Hummus Veggie Wraps; Fruit
Sunday: Crock-Pot Pork Carnitas w/cabbage & fixings
extras this week: Mac & Cheese for Ginny (she's been asking); Sweet Potato Bars test #1 

Sunday, February 2, 2014

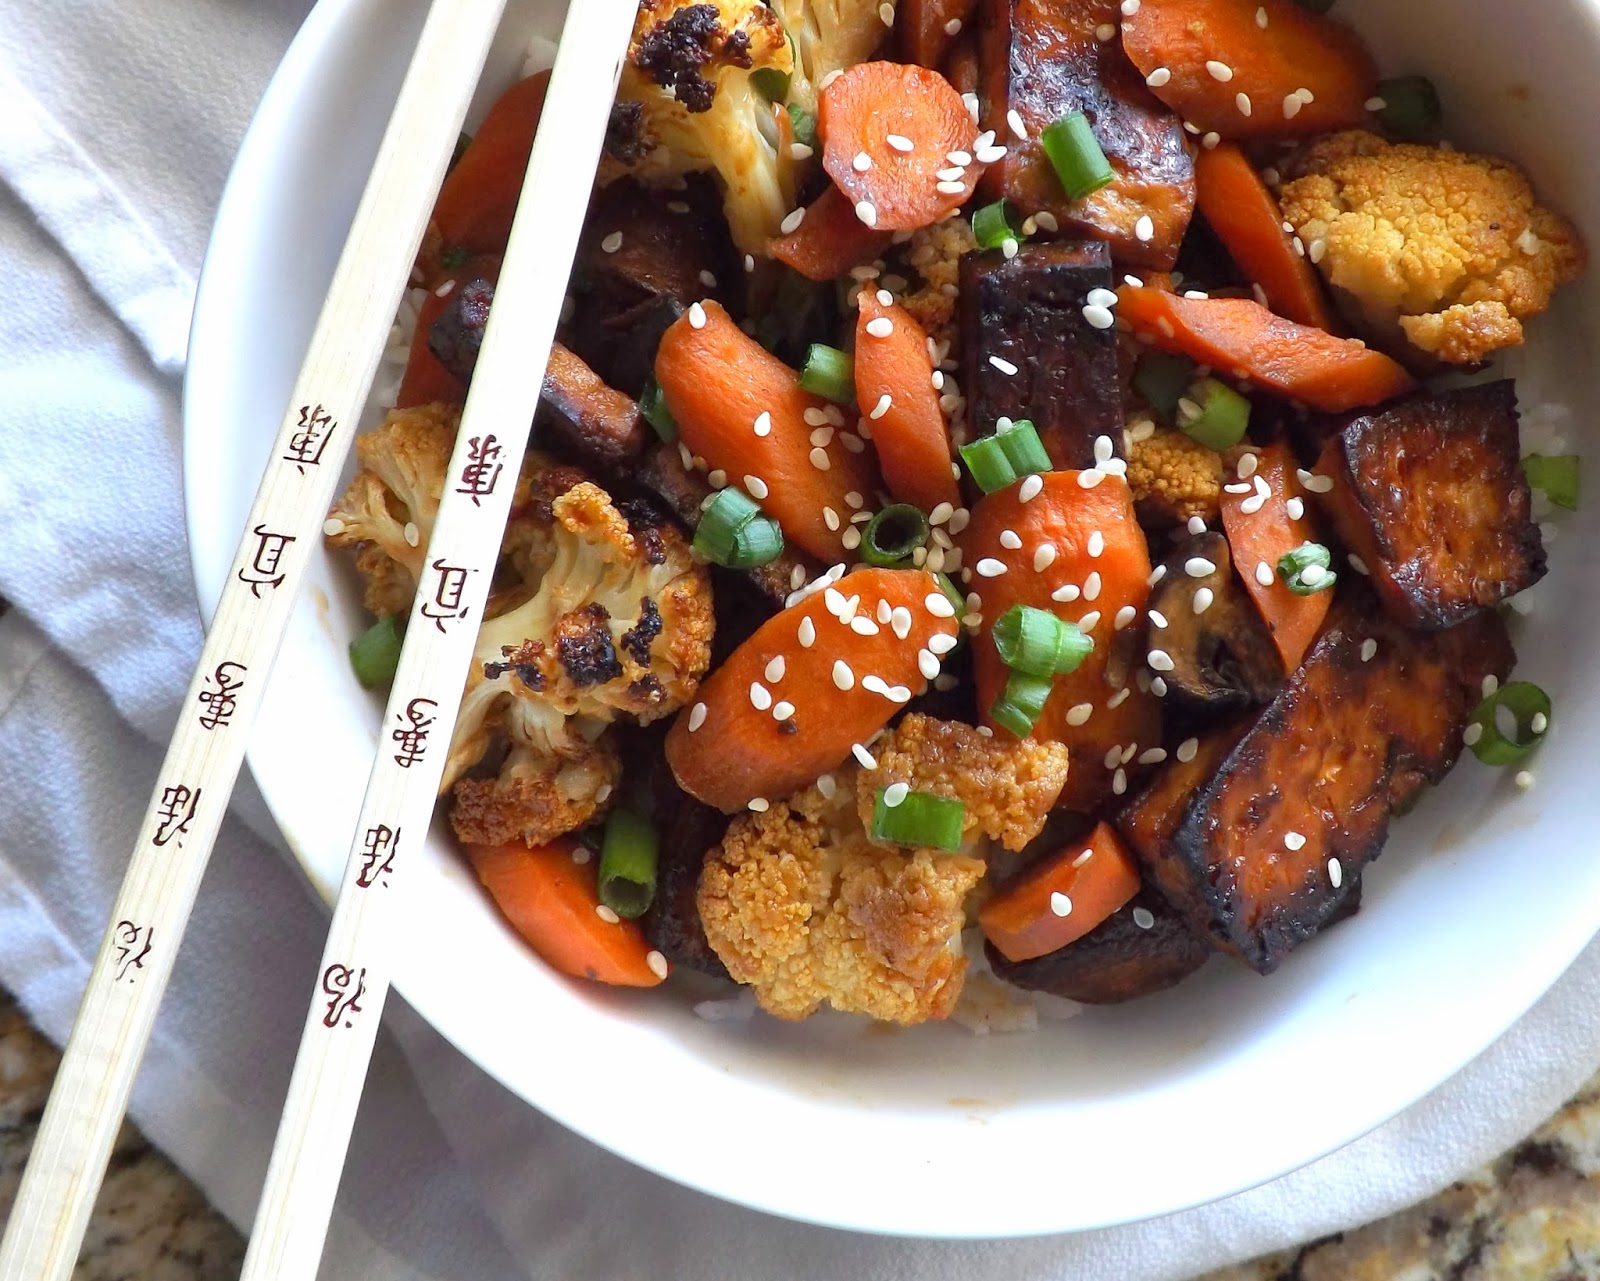
Roasted Sesame Tofu & Vegetables


Even if you don't like tofu I think you should try this recipe because the roasting gives the tofu such a nice texture--dense and almost meat-like. And the flavor of the sauce and the crispy browning/blackening is so, so nice! If you really can't stand the thought of tofu, you can probably make this with chicken. I haven't yet, but if I was going to, I'd cut 1 pound of chicken (probably boneless thighs because thighs hold up better in high heat) into 1-in pieces, and roast the pieces with the veggies until they were done, which would be way before the veggies are done, so I'd really watch them and remove them when the were done but not dried out. I'm guessing it might take 10 or 15 minutes. I'll try it someday and post an update.

Funny story for you: my oldest is now 17 and getting ready to graduate from high school. She loves tofu. She was quite a bit younger when I first started making this recipe--I'd say, 10'ish--and tofu did not cross her lips. One time after making this recipe I gave her a piece of the tofu to try (this was before I decided that longer cooking, which meant lots of delicious browning and crispy blackness, was better, so the tofu wasn't quite as amazing as this, and was definitely more tofu-like). She asked what it was. I told her to just try it. She did. It didn't go over very well, and she accused me of making her think it was a piece of potato, when, in fact, it was disgusting tofu, which I didn't. I might not tell you what it is at first, but I don't call it something it's not. Anyway, she told her personal horror story for years, usually when I was making something with tofu. Or talking about tofu. Or thinking about tofu. "Ach! Mom! Remember that time you made me eat a piece of tofu and I thought it was potato?? *gagging noises*". Then, all of a sudden about a year ago, she decided that tofu was amazing. Kids. Who understands them, anyway, right? 

Tofu is great because it absorbs the flavors of whatever sauce you put on it, which is perfect for this recipe because the marinade and sauce is so, so, so good. It's hard to go wrong with things like hoisin sauce and soy sauce and sesame oil. MmmMmm! 

I should say that when I make this I never feel like one package of tofu is enough, and wish I had remembered to buy two packages. And then I forget the next time. So consider using two packages if you really like tofu.


Roasted Sesame Tofu & Vegetables

1-2 14-oz packages Extra-Firm Tofu (see above)
1/2 cup soy sauce
2 1/2 tablespoons hoisin sauce
2 tablespoons olive oil
1 lb carrots, scraped and sliced on the diagonal
1 lb cauliflower (1 smallish head), cored and cut into bite-sized pieces
8 oz cremini mushrooms, halved or quartered if large
2 tablespoons rice wine vinegar
2 teaspoons sesame oil
1/2- 1 teaspoon chili-garlic paste
6 green onions, green parts only, thinly sliced
sesame seeds for garnish, if desired
Hot cooked rice for serving

1. Heat your oven to 450, and adjust your oven racks so that you can cook two baking sheets at a time (in my oven this is the 2nd and 4th positions). Line two baking sheets with foil and spray with non-stick spray or mist with olive oil.

2. Use paper towels to pat the block of tofu dry and then cut it into 32 pieces. (I make 4 horizontal cuts, 4 vertical cuts, and then 1 more cut right down the middle.) Set aside.

3. In a large bowl, whisk together the soy sauce, hoisin sauce, and olive oil. Reserve 3 tablespoons of the mixture in a small bowl and set it aside.

4. Add the carrots, cauliflower, and mushrooms to the large bowl and stir until they are coated with the marinade. Use a slotted spoon to transfer the vegetables to one of the prepared baking sheets. Add the tofu to the bowl and gently stir to coat the pieces with the marinade. Let it sit for about 5 minutes. Use a slotted spoon to transfer the tofu to the second prepared baking sheet. Discard the marinade and use a paper towel to wipe out the bowl.

5. Put both baking sheets in the oven at the same time and roast, stirring occasionally, until the tofu is browned and crispy, and the vegetables are tender and browned, and scorched in places, 30-35 minutes. Switch the baking sheets' position once or twice during roasting so nothing burns. My vegetables are usually done before the tofu, so I just take them out of the oven and let them sit, loosely covered with foil, until the tofu is ready.

6. To the 3 tablespoons reserved marinade, add the rice wine vinegar, sesame oil, and chili-garlic paste, and mix well.

7. Transfer the roasted tofu and vegetables to the large bowl, and add the green onion. Drizzle all with the sesame oil mixture and mix gently to distribute it on all the pieces. Serve tofu and vegetables over the hot cooked rice and sprinkle with the sesame seeds if desired.

Makes 4-6 servings.
Related Posts Plugin for WordPress, Blogger...